Creating a professional and visually appealing YouTube channel begins with a strong banner. Your banner is the first thing people see when visiting your channel, so getting it right matters. Many creators struggle to resize image for YouTube banner correctly, and this guide will help you understand every detail step-by-step. This article is designed to be easy to read, highly informative, and perfect for beginners who want to learn how to resize image for YouTube banner without confusion.
In this guide from Graphics Revive, we will explore what dimensions YouTube requires, why resizing matters, which tools you can use, and how to avoid common mistakes. Whether you’re a content creator, marketer, or designer, you’ll learn everything you need to know to resize image for YouTube banner effectively.
Understanding the Importance of Correct Banner Dimensions
Before you learn how to resize image for YouTube banner, it’s important to understand why accurate sizing matters so much. YouTube automatically adjusts your banner to different devices, including TVs, desktops, tablets, and smartphones. Without proper dimensions, your banner may appear blurry, stretched, or cropped in the wrong places.
A well-resized banner enhances your brand, makes your channel look professional, and gives your audience a pleasant visual experience. If your image is not resized properly, key elements such as logos, text, or important visuals might get cut off on smaller screens. This is why taking time to resize image for YouTube banner correctly is absolutely essential.
Standard YouTube Banner Dimensions
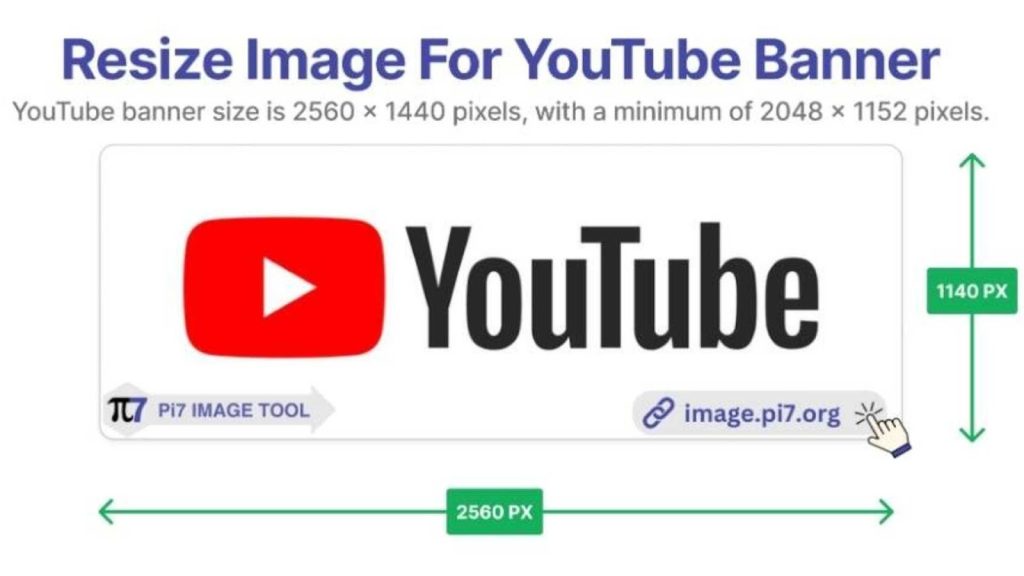
To resize image for YouTube banner correctly, you must follow the official YouTube size guidelines. YouTube recommends:
- Recommended Banner Size: 2560 x 1440 pixels
- Minimum Upload Size: 2048 x 1152 pixels
- Safe Area for Text & Logos: 1546 x 423 pixels
- Maximum File Size: 6 MB
This “safe area” is the most important part of your banner. When you resize image for YouTube banner, make sure that any crucial content falls within this safe zone, otherwise parts of your banner may disappear on mobile devices.
Understanding these guidelines helps ensure your banner will look great no matter where it’s viewed. Many creators forget this step, which leads to uneven or distorted visuals. That’s why learning the right way to resize image for YouTube banner is a skill worth mastering.
Preparing Your Image Before Resizing
Before you actually begin the process to resize image for YouTube banner, it helps to prepare your image carefully. Start by choosing a high-resolution image that fits your brand’s style. If your image is low quality, resizing will make it look pixelated, especially on larger screens like TVs.
Try to use images with plenty of negative space so the banner doesn’t feel overcrowded. You should also decide where your main visual elements will go so they fit inside the safe area after you resize image for YouTube banner properly.
If your image needs retouching—such as background removal, color correction, or enhancing details—you can use tools like Photoshop or online editors. You can also use professional editing services like Graphics Revive for perfect results.
Choosing the Right Tool to Resize Your Banner
There are many tools available that make it easy to resize image for YouTube banner, including online platforms, mobile apps, and desktop software. Most tools allow you to enter custom dimensions, which is essential for YouTube banner design.
Popular options include:
- Adobe Photoshop for advanced editing
- Canva for beginners
- Photopea as a free online alternative
- GIMP for open-source editing
- Pixlr for quick resizing
No matter which tool you choose, the process remains similar. You simply upload your image, enter the required YouTube dimensions, and then adjust your design within the safe area. Keeping these steps in mind ensures your attempt to resize image for YouTube banner goes smoothly.
Step-by-Step Guide: How to Resize Image for YouTube Banner
Resizing your image is simple when you follow the right approach. Begin by opening your editing tool of choice and importing your image. Next, locate the resize or canvas size option. This option may appear under “Image,” “Canvas,” or “Resize Settings,” depending on the software.
Once there, manually type 2560 x 1440 pixels as your target dimensions. This is the preferred banner size, and it ensures your banner fits YouTube’s layout. If the software asks you to lock or unlock aspect ratio, make sure you unlock it if your image already has different proportions. This step gives you full control when you resize image for YouTube banner to fit properly.
After resizing the main canvas, drag and adjust the elements of your design into the safe zone. This ensures that your most important text or visuals won’t be cropped on smaller screens. Many beginners skip this step and wonder why their banner looks wrong later. That’s why understanding where the safe area is becomes essential to successfully resize image for YouTube banner.
Once everything is aligned, preview your design in multiple sizes if your tool allows it. This simulates how your banner will appear on different devices. When you feel satisfied, save the image in PNG or JPG format. Just ensure the file size doesn’t exceed 6 MB.
The Importance of the Safe Zone
The safe zone might be the most crucial part of this entire process. When you resize image for YouTube banner, you must place your key information—including your channel name, slogan, or logo—within this 1546 x 423 pixel area.
This zone is the only part consistently visible across all devices. If your design extends outside the safe zone, phone or tablet users won’t see the complete banner. This is one of the most common mistakes creators make when trying to resize image for YouTube banner, and avoiding it ensures your banner appears clean and balanced.
Think of your banner like a flexible layout. The safe area remains fully visible everywhere, while the outer sections may get trimmed depending on screen size. As long as your essential content stays centered within this safe area, your banner will look professional everywhere.
Common Mistakes to Avoid When Resizing
While learning to resize image for YouTube banner, many creators make the same errors. Here are key mistakes to avoid:
Some people stretch their images to fit the dimension requirements. While this may technically make the image the right size, the result is usually distorted. Stretching causes your banner to lose its natural proportions, making it look unprofessional.
Another common mistake is using low-resolution images. When you resize image for YouTube banner, especially upscaling a small image to a larger size, pixelation becomes obvious. Always begin with high-resolution photos.
Many users also forget to check the safe zone. They upload their banner and only later realize that text or graphics are cut off. Taking time to preview your banner before finalizing it helps avoid this issue.
Finally, creators sometimes forget about file size. YouTube rejects anything over 6 MB. This means if your design is too detailed or heavily layered, you may need to compress it. Just be sure compression does not ruin the clarity when you resize image for YouTube banner accurately.
Why High-Quality Images Matter
If you want your YouTube channel to stand out, you need a banner that looks crisp on every device. This is why starting with high-quality visuals before you resize image for YouTube banner is important. TV screens display images at very large sizes, so any imperfections become obvious.
Good quality ensures your colors appear vibrant, your text stays sharp, and your layout looks intentional. If your existing image is not high quality, consider editing, enhancing, or recreating your design. Professional services like Graphics Revive can assist with making your banner look flawless.
Best Practices for Designing a YouTube Banner
A great banner isn’t just correctly sized—it must also be visually appealing and aligned with your brand identity. When you resize image for YouTube banner, consider what message you want your viewers to receive at first glance.
Think about your channel theme. Are you focusing on gaming, lifestyle, beauty, education, or business? Colors, fonts, and images should reflect your niche. Keep the design simple, clean, and not overcrowded.
Use readable fonts and avoid placing text near the edges. Even if the banner is correctly resized, edge placement may cause cropping on some devices. Keeping your design centralized protects you from visibility issues after you resize image for YouTube banner.
Consistency matters too. Match your banner with your profile picture, thumbnails, and overall branding style. This creates a cohesive look that viewers will remember.
Uploading Your Resized Banner to YouTube
Once you complete the process to resize image for YouTube banner, uploading it is simple. Go to your YouTube channel, click “Customize Channel,” then choose the “Branding” tab. From there, you can upload your new banner.
YouTube will show previews for desktop, mobile, and TV. Check the previews carefully to make sure your safe area content appears correctly on all screens. If something seems off, go back and adjust your design. Perfecting your banner may take a few tries, especially when you’re learning how to resize image for YouTube banner for the first time.

Final Tips for Achieving the Best Results
When working to resize image for YouTube banner, remember that creativity and precision go hand in hand. You must balance artistic design with technical requirements. Using templates, guides, and safe-zone overlays can help make the process easier.
Always keep backups of your original design. If you need future updates, having a layered editable file will save time. Regularly updating your banner also keeps your channel fresh and relevant.
If resizing seems too time-consuming or complicated, don’t hesitate to seek expert help. Professional editors can ensure your banner looks perfect, sharp, and accurate on all devices.
Need Professional Help? Graphics Revive Is Here for You
If you want a polished, professionally designed banner without the hassle of learning how to resize image for YouTube banner yourself, Graphics Revive is here to help. We specialize in image editing, resizing, enhancement, retouching, and custom banner design.
We guarantee high-quality results, quick turnaround, and designs tailored specifically to your brand. Whether you need a new banner, thumbnail design, or any type of graphic enhancement, Graphics Revive can bring your ideas to life.
