If you are just starting with basic image editing, you might be wondering How to Resize an Image Using Paint without breaking anything or making your picture look blurry. The good news is that Microsoft Paint makes the whole process simple, even if you have never edited a photo before. You don’t need expensive software to change the size of a picture for a document, social media, or email. All you really need is a clear explanation and a bit of practice.
In this article, we’ll walk through How to Resize an Image Using Paint in a beginner-friendly way. We’ll explain what resizing actually does, why images get blurry when resized incorrectly, and how you can avoid those problems. By the end, you’ll be confident enough to resize photos for your website, school project, or online store using just Paint.
We’ll also show you where resizing in Paint is enough and where professional help can make a real difference-especially if you need clean, sharp images for business. Since Graphics Revive provides a dedicated image editing service, we’ll also talk about how our team can help you go beyond the basics when Paint is not enough.

Why Learn How to Resize an Image Using Paint?
Before we jump into the clicks, it helps to understand why so many people search for How to Resize an Image Using Paint in the first place. Paint comes pre-installed with Windows, which means you don’t have to download anything or pay for extra tools. It is always there when you need a quick edit.
Maybe someone sent you a huge photo from a phone, and you just want something smaller to attach in an email. Maybe you run a small business and need product images to fit nicely on your website. Or maybe you want to resize a profile picture for Facebook, Instagram, or LinkedIn. In all these situations, knowing How to Resize an Image Using Paint saves time and keeps your workflow simple.
Another big reason to learn this is control. When you understand How to Resize an Image Using Paint correctly, you can avoid stretched faces, squished logos, and pixelated images. Instead of guessing or asking someone else every time, you’ll be able to handle basic resizing on your own.
Understanding What “Resize” Really Means
Before you follow the steps for How to Resize an Image Using Paint, it’s important to understand what resizing actually does. When you resize an image, you’re changing its dimensions-its width and height. These dimensions are measured either in pixels or percentage.
- Pixels: These are the tiny dots that make up your image. A bigger image has more pixels.
- Percentage: This is a relative way of resizing. For example, if you resize an image to 50%, it becomes half its original size.
Resizing is not the same as cropping. Cropping means cutting away parts of the image. Resizing keeps the entire image but changes how large or small it appears. When learning How to Resize an Image Using Paint, you will use resizing-not cropping-unless you want to remove parts of the picture.
Another concept you’ll see when working through How to Resize an Image Using Paint is “aspect ratio.” This simply means the relationship between width and height. If you don’t keep the aspect ratio locked, your image may look stretched or squashed. Paint has an option to maintain this ratio automatically, and you should almost always keep it on.

Opening Your Image in Paint
Now let’s start going through How to Resize an Image Using Paint from the very beginning: opening your image.
First, locate your image file on your computer. It might be in your Pictures folder, Downloads, Desktop, or a project folder. Once you find it, right-click on the image. In many versions of Windows, you’ll see an option like “Open with” and then “Paint.” Click that to open your image directly in Paint.
If that option doesn’t show, you can open Paint first. Click the Start menu, type “Paint,” and open the app. Then go to the “File” menu in Paint, choose “Open,” and browse to select your image. Once your image appears inside the Paint window, you are ready to follow the main steps of How to Resize an Image Using Paint.
Take a moment to look around the Paint interface. At the top, you will see the toolbar with options like Home, Resize, Rotate, and more. The “Resize” button is the main feature you will use when you follow How to Resize an Image Using Paint properly.
How to Resize an Image Using Paint: The Main Resize Button
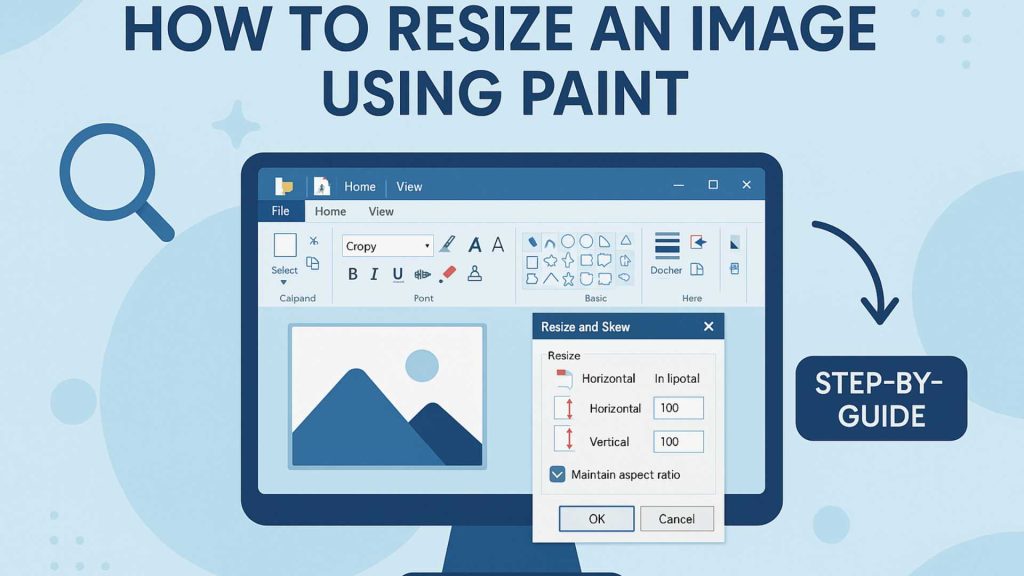
Once your image is open, you’re ready to get into the core of How to Resize an Image Using Paint. On the Home tab in Paint, you’ll see a section called “Image.” Inside that section is a button labeled “Resize.” Click that button to open the Resize and Skew window.
This small window is the heart of How to Resize an Image Using Paint. Here, you get to choose whether you want to resize by percentage or by pixels. You’ll also see a checkbox that says “Maintain aspect ratio.”
Most of the time, when people search How to Resize an Image Using Paint, they want a simple way to reduce the image size without distortion. Keeping “Maintain aspect ratio” checked ensures that the image stays in the correct shape. You only change the width and Paint automatically calculates the height, or vice versa.
If you want to make the image smaller, you can type a lower value. For example, if your image is very big, you might change it to 50% or reduce the pixel width. If you want it larger, you can increase the percentage or pixel values, but be careful-making images bigger can reduce quality and cause blur.

Resizing by Percentage in Paint
One of the easiest ways to understand How to Resize an Image Using Paint is by using the percentage option. This is especially helpful when you don’t know the exact pixel dimensions you need, but you know you want the image to be, for example, half the size.
In the Resize and Skew window, choose “Percentage.” You’ll see two boxes, one for horizontal and one for vertical. Make sure “Maintain aspect ratio” is checked. Now, type a smaller number, like 50, in the horizontal box. Paint will automatically match the vertical percentage.
Click “OK,” and you’ll see your image shrink on the screen. This is one of the simplest ways to practice How to Resize an Image Using Paint, and it’s perfect for reducing large photos for everyday use, such as emailing or adding to a simple document.
If the image is still too large, you can repeat the process and reduce it again. Just don’t go too small unless you’re sure, because shrinking too much can make the image hard to see or use.
Resizing by Pixels in Paint
If you are preparing images for websites, social media banners, or specific design templates, you might need precise sizes. In that case, understanding How to Resize an Image Using Paint by pixels is very useful.
Again, open the Resize and Skew window, but this time select “Pixels” instead of “Percentage.” You’ll see the current width and height of your image in pixels. With “Maintain aspect ratio” checked, you only need to change one value-usually width. For example, if your website needs images that are 800 pixels wide, you enter 800 in the horizontal box. Paint will adjust the vertical value automatically.
Click “OK” and Paint will resize your image to the exact pixel width you entered. This method makes How to Resize an Image Using Paint much more controlled. It is especially helpful for blog images, eCommerce product photos, and banners where consistent sizing looks professional and clean.
Keeping Images Sharp While Resizing in Paint
A common worry when people learn How to Resize an Image Using Paint is losing quality. It’s true that if you resize carelessly, your picture might look fuzzy or pixelated. Here are some simple principles to keep in mind while following How to Resize an Image Using Paint in a quality-conscious way.
First, downsizing (making an image smaller) is usually safe. Many large photos from modern phones can be reduced to smaller sizes without noticeable quality loss. The problem mainly appears when you try to make images much larger than they were originally.
Second, if you know you’ll need a large image in the future, try to start with a high-resolution original. Resizing down works better than resizing up.
Third, when you’re finished with How to Resize an Image Using Paint, choose an appropriate file format when saving. PNG works well for graphics, logos, and images with text. JPEG is good for photos when you want a smaller file size. Saving repeatedly in JPEG can slightly degrade quality, so if you need to edit again later, you might keep a backup copy of the original image.
Saving Your Resized Image Correctly
After going through the steps of How to Resize an Image Using Paint, don’t forget the most important part: saving your work correctly. You usually don’t want to overwrite your original file, especially if you might need it later in full size.
Once you are satisfied with the new size, go to “File” and choose “Save As.” Give the image a new name, such as “photo-resized-800px.jpg” or “profile-small.png.” This helps you remember the version and size later. Choose the format you prefer (PNG or JPEG are common).
Using the “Save As” option is a small but important habit when practicing How to Resize an Image Using Paint. It protects your original image and gives you freedom to experiment without worrying about losing the full-resolution version.

Resizing for Different Uses: Web, Social Media, Email, and Print
When learning How to Resize an Image Using Paint, it helps to think about where your image will be used. Different platforms and purposes may require different dimensions.
For websites and blogs, you might resize the width to something like 800–1200 pixels for main content images. For small thumbnails or previews, much smaller sizes like 300–400 pixels wide may be enough. You can simply test different widths while applying How to Resize an Image Using Paint until you find what looks best on your site.
For social media profile photos, banners, or posts, each platform has recommended sizes. Paint doesn’t know these limits automatically, but once you know the pixel size you need, you can easily apply it using the pixel method in How to Resize an Image Using Paint.
For email attachments, the goal is usually to reduce file size so the email sends quickly. In that case, reducing the percentage or lowering the pixel dimensions to something modest will usually work fine.
Printing is a bit more complex, because resolution (DPI) also matters. Paint is very basic and doesn’t offer advanced print controls like professional software. Still, you can use How to Resize an Image Using Paint to roughly match the size you want, but for serious print work, you may want professional editing services-exactly the kind of support Graphics Revive can provide.
Common Mistakes to Avoid When Learning How to Resize an Image Using Paint
Even though How to Resize an Image Using Paint is simple on paper, beginners often make a few common mistakes. One frequent issue is unchecking “Maintain aspect ratio” and then entering different width and height values. This can cause faces to look wide or tall and logos to appear twisted. Unless you have a very specific reason, always leave that option checked.
Another mistake is enlarging tiny images to huge sizes and expecting them to look perfectly sharp. When you follow How to Resize an Image Using Paint, remember that Paint doesn’t “invent” detail; it just stretches existing pixels. Going from a small 200-pixel image to a 2000-pixel one will almost always lead to visible quality loss.
Some people also overwrite their original file without meaning to. That’s why one of the golden rules of How to Resize an Image Using Paint is to save your resized version with a different name. This small detail can save you from frustration when you want to go back to the original later.

Extra Tips for Beginners Using Paint
Once you’re comfortable with How to Resize an Image Using Paint, there are a few extra tips that can make the process smoother. For example, use the zoom tool to check your resized image more closely. Sometimes, an image that looks fine at full screen reveals blur or pixelation when zoomed in. This is especially important for product photos or images with text.
Another tip is to combine resizing with a little cropping when needed. While resizing keeps the full image, sometimes you don’t need all the background. You can crop out distractions and then apply How to Resize an Image Using Paint to focus on the main subject.
Also, if you make a mistake, remember that the Undo button (or Ctrl + Z) is your best friend. You can quickly step back and try a different size. Don’t be afraid to experiment. That’s how you learn the best way How to Resize an Image Using Paint works for your particular needs.
When Paint Isn’t Enough: Let Graphics Revive Help
While How to Resize an Image Using Paint works beautifully for simple personal tasks, there are times when you need more than a basic resize. If you are managing a brand, an online store, or professional portfolio, you might need perfectly aligned images, consistent backgrounds, color correction, retouching, or bulk resizing for hundreds of photos at once.
That’s where Graphics Revive comes in. We provide a complete image editing service designed for people and businesses who want their visuals to look polished and consistent. Instead of spending hours trying to resize and adjust every image manually, you can let professionals handle it for you.
You can visit our website at https://graphicsrevive.com to learn more about our services. If you need tailored help, you can also reach out through our contact page at https://graphicsrevive.com/contact for custom image resizing, background editing, retouching, and more.
So, whether you are just learning How to Resize an Image Using Paint for personal use or you’re running an online business that needs sharp, optimized photos, Graphics Revive is here to support you. Start with Paint for quick fixes, and when you are ready for professional-level results, our team will happily take your images to the next level.
